
Written by: Hannah Kimmel
Hello, visitors of Growit Buildit!
My name is Hannah and my husband’s name is Ned. We’re from the Making Life. I recently reached out to Joe and Tara from Growit Buildit to ask if they would be interested in a guest post from our blog.
They’re a husband and wife team that focuses on growing things and making things, and we’re also a husband and wife team in the same general niche. Thankfully, Joe and Tara graciously allowed us to write a special guest post for their blog.
So here’s a little about us at the Making Life.
A year ago my husband and I had a dream. We wanted to create blog posts and videos for people that like to make things. We’re makers and we wanted to connect with the growing maker community in a more tangible way. We also wanted to inspire people that they don’t have to have tons of equipment or exceptional skills to start making things.
Ned is a woodworking, chainsaw running, homesteader type with a background in communications media. I’m a sewing, painting, gardening, all-around crafter, and I also happen to be a freelance writer. It just made sense to create the Making Life.
Now that we’ve introduced ourselves, let’s talk about the projects we want to share with you. We’ve put together three nature inspired Christmas ornament ideas for this holiday season.
We chose nature inspired because it’s the perfect merging of growing and building that is the essence of Growit Buildit.
BE SURE TO PIN IT TO SAVE FOR LATER, TOO: Let’s get down to how you can make your very own nature inspired Christmas ornaments.
Nature Inspired Christmas Ornament Project #1: Leaf Rubbing Garland

The first one that we wanted to show you is the leaf rubbing garland. It’s a really great project for kids, but even as an adult, I found this really enjoyable.
A few weeks ago we visited the Carnegie Museum of Art with our kids. They had a little art table set up with color sticks and raised cardboard pictures. The kids sat down and used the cardboard impressions to create new pieces of art. They really loved it and we saw adults enjoying this project as well.
That’s sort of what inspired this little Christmas ornament. I remember doing something similar in a Kindergarten class as a child, and it was a warm memory. There’s something really satisfying about seeing the perfect impression come through on your paper.
OK so let’s get down to how to make this nature inspired ornament.
What You Need to Make a Nature Inspired Leaf Rubbing Garland

Here’s a very short list of supplies you need to finish this project:
- Crayons or Color Sticks
- Real Leaves
- Paper
- Scissors
- Yarn
- Hole Punch
- Safety Pins (optional)
- Laminator (optional)
Step One: Collect Leaves
For this nature inspired ornament, the first thing you have to do is step out into nature. Walk around your yard and start collecting the prettiest leaves you can find.
If you don’t have a yard of your own where you can collect leaves, you can always take a trip to the park. If you have kids, they’ll love this extra step!
Step Two: Get an Impression of the Leaves

The next step is to put the leaves under a piece of paper. Once you’ve done that, you can use the side of an unwrapped crayon to rub against the paper. At the Carnegie Museum of Art, they used color sticks instead of crayons. Color sticks are the same material as the inside of a pencil. They’re really cool, but we don’t own any, so I used crayons.
When you’re creating your impression be very careful not to let the leaf under the paper move. If you do, your final image will be shifted. It’ll look like two or more impressions. This could create a cool effect, but it wasn’t what I was going for.
Since this project is a nature inspired Christmas ornament, I chose Christmas colors. Red, green, gold, and bronze. I thought the metallic colors were really fun but the red showed up most brilliantly.
Step Three: Laminate the Leaf Rubbing

This step is totally optional if you don’t have a laminator or don’t feel like taking it to a copy store to be laminated. However, I do feel that laminating it will make it a longer-lasting product and it won’t just be thrown away at the end of the season. This is a garland you can put up year after year with your other Christmas ornaments.
If you already own a laminator, this step is easy. Simply take the sheet of paper with your leaf rubbing and put it in the laminating pouch. Once the laminator is heated, feed your leaf rubbing into the machine. Don’t push it through — it does all the work for you.
Put all the leaves you want on your garland through the laminator.
When the laminated leaf rubbing comes out, cut around the shape of the leaf. I cut around the leaf leaving about a quarter to half an inch of white all around.

Step Four: String the Leaf Rubbing Garland
The last step is really, really easy. With a hole punch, punch a small hole in the top of each of your “leaves.” I couldn’t locate a hole punch so I used a leather punch instead. I mean whatever works 🙂

I had a handful of safety pins that I decided to use for this Christmas nature inspired ornament. I felt like it added a little charm to the project.
If you don’t have safety pins or aren’t thrilled with this idea, you can go ahead and string the yarn right through the leaves. The nice thing about the safety pins, though, is that it allows the leaf garland to lay flat. Your leaves won’t be turning sideways when you hang them up. I chose to hang mine on the wall so I wanted them to be flush with the wall.
To use safety pins the way I did, you’ll first need to put the safety pin through your hole punch. Once you’ve done that, close up the pin. There’s a natural hole in the head of the safety pin and that’s what I used to string the yarn. I chose a cotton yarn in Christmas colors because it was a bit more festive.

And that’s it! Now you just have to find a location in your home to show off your new leaf garland inspired by nature right around your home!
Nature Inspired Christmas Ornament Project #2: Beeswax Ornament

So one thing that you should know about us at the Making Life is that we love honey bees. We currently have about a dozen hives (although that number will probably change after winter). I’ve been trying to think of ways to use our extra beeswax, and I came across an adorable idea. You can make beeswax ornaments for your Christmas tree.
I felt like this was a really fun addition to our round-up of nature inspired Christmas ornaments because it’s actually using materials created by nature. Plus, if you like honey bees then you’ll probably enjoy the smell of this project. I love the smell of beeswax so maybe I’m partial 🙂
If this sounds like something right up your alley then read on to learn how to make your very own beeswax ornament.
What You Need to Make a Nature Inspired Beeswax Ornament

There’s a short list of supplies that you need for this project so no need to worry about collecting a lot of things. Here’s what you should get:
- Beeswax (white or yellow — I like the look of the yellow beeswax)
- Double boiler (or homemade double boiler system)
- wax mold
- thin ribbon

Here’s a picture of the plastic mold that we purchased at Michael’s.
Step One: Melt Your Beeswax
Note: One thing to always keep in mind about beeswax is that it is flammable. You should always be cautious not to overheat it and you should never leave it unattended.
When you melt any type of wax, it’s better to use a double boiler than to put it under direct heat. We don’t have a double boiler so we have to create our own. Basically, this means that you need to have a pot with boiling water and another container to hold your wax that goes in the boiling water.
We use a candle making pitcher to melt our wax. It’s convenient because it’s so easy to pour the wax once it’s melted. It’s inconvenient because the pitcher tends to float in the water if there’s not enough wax in it. I’ve also heard of people using old metal cans to melt the wax, glass bowls, and a lot of other things. There are a lot of ways to make yourself a double boiler and it doesn’t have to cost you anything extra.
Another thing to know about beeswax is it sticks to everything. Whatever container you use to melt your wax should be dedicated to the project. You’re not likely to ever get the container completely clean again. The same goes for any tools you use to mix or pour the wax.
And lastly, remember to never pour wax down your sinks. It can do serious damage to your plumbing since wax is made to last forever.
OK, so with all those disclaimers, here’s how you melt the wax. Depending on the size of your mold, I suggest you melt about 1-3 cups of wax. Beeswax bead pellets are the easiest to work with, but you really don’t have to be picky with your beeswax for this project.
Put a pot of water on the stove and turn the temperature to medium or medium-high. Fill your container with the beeswax and put it inside your pot of water. Bring the water to a gentle boil and leave it at that temperature.
Your wax will soon begin to melt. It’s fun to watch this process and it doesn’t take very long. While the wax is melting, you can move on to the next step: cutting your ribbon.
Step Two: Get the Ribbon Ready

I chose a red ribbon for this Christmas ornament but you can choose whatever color speaks to you. To get the ribbon ready, cut about two to three inches of ribbon from the spool. Loop your ribbon around and make a simple knot at the bottom.
Cut off the excess ribbon at the bottom of the knot, and place the ribbon into your mold.
Step Three: Pour the Wax into Your Mold

The mold that we used for this project was a plastic soap mold that we found at Michael’s. I think a silicone mold would be easier to work with, but they didn’t have a big selection at our Michael’s.
For this part, I poured the wax halfway into the mold and placed my ribbon in the melted wax. You want to make sure that the ribbon doesn’t go to the bottom because you’ll see the ribbon through the wax. Also, it won’t sit in the correct position for hanging on the tree.
You can put a small object on the other side of the ribbon to keep it from sinking too deeply into the wax.
When the wax began to cool, I melted some more wax and poured it on top. This was the best way to keep the ribbon where I wanted it.
Step Four: Let the Wax Cool Completely

Now I know what you’re thinking. How soon can I pop these babies out?
If you’re like me this process makes you feel extremely impatient. But, I promise it’s better to let it cool down completely before you try to remove it. Otherwise, you risk squishing the warm wax and that would be a shame. So let it cool, and then gently remove it from the mold.
The result??

I don’t know about you, but I think they’re just lovely! So simple. So pretty. So fun.

Nature Inspired Christmas Ornament Project #3: Wood Cookie Ornament

Alright. We have one last final nature inspired Christmas ornament for you and I think this one is really fun.
There are a lot of people who enjoy making wood cookie ornaments. And there are some seriously amazing and adorable choices out there.
This summer we cut down a cedar tree next to our house. It was beautiful but it was holding moisture against our house and causing problems. So it had to come down.
When we cut down the tree Ned also cut up some wood cookies to be made into ornaments later. I thought this tutorial would be a great time to use them!
I used my Cricut to make this ornament. Of course, if you don’t have a cutting machine it will be harder to make. You can still make it, but you’ll have to be good at hand lettering. I’m not the best, so I used my Cricut.
For more information about this nature inspired Christmas ornament, keep scrolling.
What You Need to Make a Nature Inspired Wood Cookie Ornament
- A cutting machine/Cricut
- Vinyl (any color will do)
- Transfer tape
- A wood cookie
- Paint
- Paintbrushes
- Sandpaper
- Eye hooks
- twine
Step One: Design Your Lettering in Cricut Design Space
I decided to use the phrase “Merry and Bright” for this design. You can use any phrase you like. This one was just fun and cheery so that’s what I used.
I didn’t have the kind of font I wanted for this design, so I downloaded one from Font Space called Mochary.
It’s really important to note that this is for personal use only. You can’t use this font to make items to sell or for profit in any way. If you would like to use it for commercial reasons, you can purchase it from the designer Mans Greback.
So here’s how I used it in design space:
First, one annoying thing that sometimes happens in design space is it automatically spaces your lettering.

That’s no good for the flowy lettering I wanted. For some fonts, you can fix this by simply adjusting the spacing. Unfortunately, that didn’t fully work for the font I chose.

If that happens to your font, there’s a neat trick you can use.
Select your text and hit the “UnGroup” button. This makes each letter separate. You can now make them line up the way you want.

I pushed the lettering together and made the M bigger because I liked the look of it. Once you’re happy with your design, select the entire text and hit the “Weld” button. This makes it act as one image that you can move around.
Go ahead and do the same thing for the rest of your phrase. When you like the way it looks, weld the whole thing together.

This is how I put together my design and I was happy with it!
Step Two: Cut and Weed Your Design

The next step is to cut out your design on vinyl. Measure your wooden cookie ornament before you cut so you know exactly how big you need to make it. I cut mine about 2.5 inches high and wide.
Ordinarily, when working with vinyl, you would remove the negative vinyl around the lettering and transfer the letters to something else. For this Christmas ornament, we’re going to use the vinyl as a stencil. So remove the lettering but make sure that you leave the inside of the letters.

This is what it looks like transferred on the wooden cookie. So pretty. So merry. So bright.
Next up is painting. Get your paint brushes ready. Time for a little creativity and color.
Step Three: Paint the Lettering on the Nature Inspired Wood Cookie Ornament
There’s something really fun and satisfying about painting on a stencil. It may not look great when you first apply the paint, but boy does it look amazing when you remove your stencil.

I chose to make the lettering on top red and the word “bright” in gold for a fun little pop. It took several coats of paint to cover it.
Remove the vinyl and voila:

Pretty pretty, right? But we’re not done because I wanted to make it look a little more nature inspired. To do this, I added some greenery around the wording.
Step Four: Painting Greenery for this Nature Inspired Christmas Ornament

The next part is painting the botanicals around the “Merry and Bright” phrase.
Now you’re probably in one of two camps. The first is the camp of people who know how to paint and will come up with their own outstanding nature design for this wood cookie ornament. The second is a camp of people who don’t yet know that they can paint something amazing. If you’re in the second camp, I photographed a small tutorial for you so you can paint along.
Here’s how I did it:

Paint two green half circles.

Add green curves on either side of the line to make it look like a pine sprig.

Continue to the top and start on the second line you painted.

Fill in all the pine needles and add more to the top and bottom to complete a circle. Now it looks like a wreath.

Add highlights and lowlights by adding in a little white and black along the green. This gives the picture just a little bit of texture. Just give a hint of color around the wreath — no need to overdo it.

Finally, add in some color with a couple of happy pine cones and some red berries. Congratulations! You created a lovely wreath for your wood cookie ornament!
Now painting it to wood is a tad bit harder than painting on paper. Be prepared for the wood to soak up the paint a lot faster than it does on paper.
Also, don’t make the mistake that I did and forego sanding your wood cookie really well. Since our wood cookies were made with a chainsaw in our own yard they were a bit cruder than the ones that you would buy from a craft store. Either way, it’s probably a good idea to sand your wood cookie well before painting.
I would also recommend practicing your design before you put the paint to wood.

Step Five: Add a String to Your Wood Cookie Ornament
The final step for this ornament is to add a string to the top. Here’s how we did this part.
To make your ornament a hanging ornament, you need to attach a string to it. One method is to drill a hole through the top center of the ornament. This works OK but it isn’t ideal for two reasons. One, you’re drilling a hole through your design. And two, it doesn’t hang correctly on a Christmas tree. It makes the ornament turn sideways.
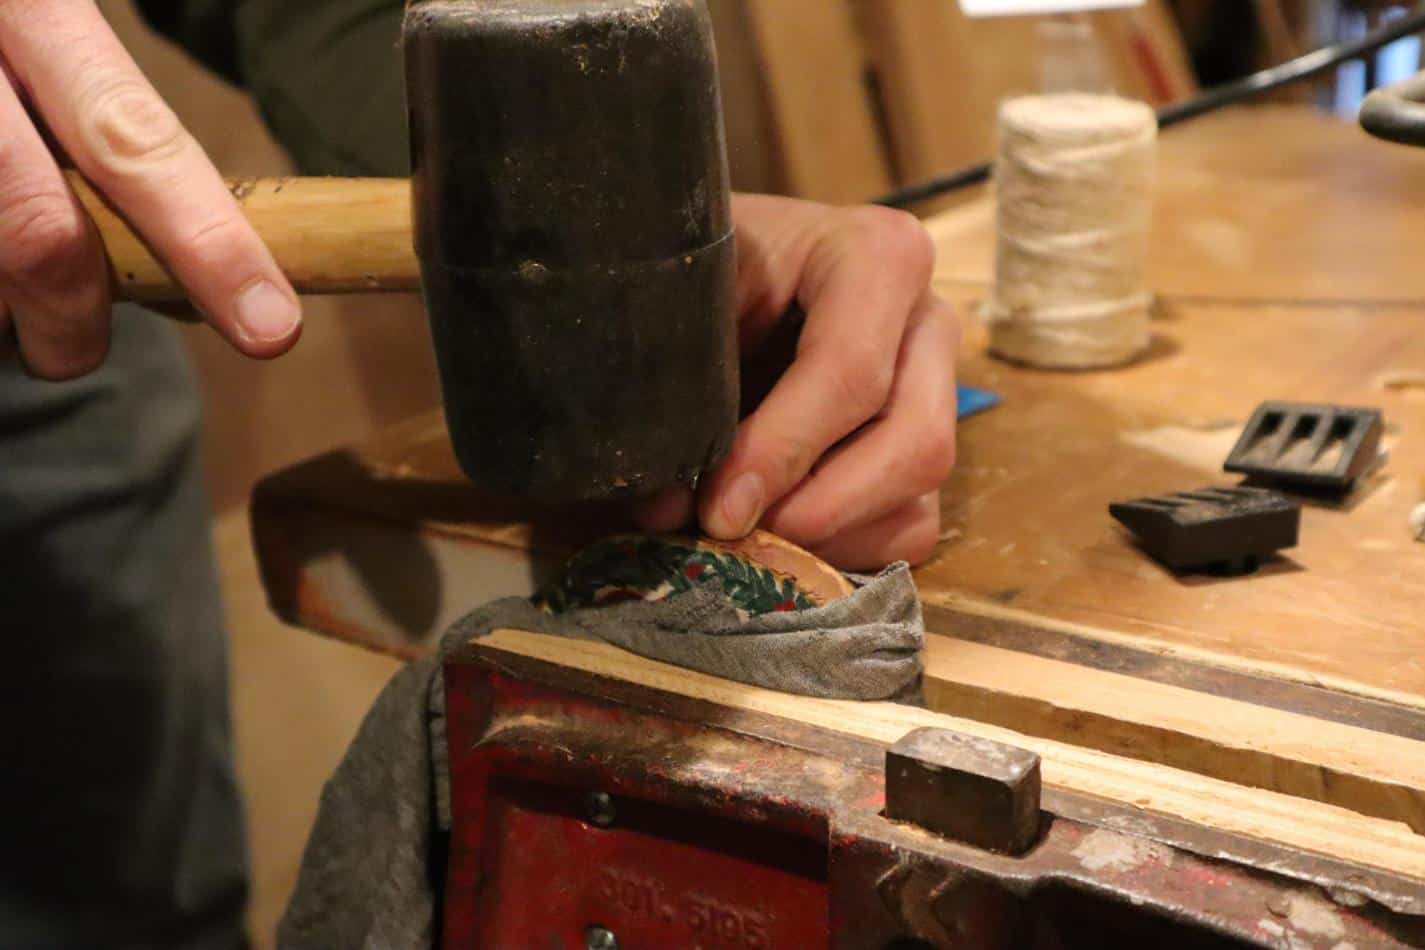
The method we chose to use is to insert an eye hook on the top of the wood cookie. Here’s a picture of Ned gently tapping the eye hook into the wood cookie. He then turned the hook by hand. Be careful with this part because it could crack the wood.
He also used a vise to keep everything in place and wrapped an old cloth around it to keep from damaging it. You don’t have to do it this way, but it does make it a little easier.
If you have a drill with a small enough bit, you could drill a small hole first and that would help with cracking.

Ned then strung some twine through the hook and tied a simple knot.

Once you’ve accomplished this step, you’re totally done!!

If you want to make a lot of these wood cookie ornaments, I suggest doing them in batches rather than finishing one at a time. This will speed up your process considerably 🙂
Enjoy Your Nature Inspired Christmas Ornaments and this Holiday Season
Thanks for sticking with us through this ornament creation blog post! We had a lot of fun making them and we hope that you will too.
We’d love to know that some of YOUR favorite Christmas ornament DIYs are. Drop your faves in the comments below.
If you want more projects like this and inspiration for makers, come visit us at the Making Life. You can also find us on Instagram at the_making_life. We can’t wait to hear from you!
PIN IT FOR LATER:

You may also enjoy:
MODERN FARMHOUSE LIVING ROOM TOUR
FREE PLANS – DIY Rustic Farmhouse Stained Board Sign
7 Ways to Update a Kitchen w/out Painting Oak Cabinets
Recent Posts
One of the more common weedy grass species one may encounter in North America is commonly known as Foxtail Grass. Foxtail grass is a common name that is used for several species of grasses of the...
Blue Stemmed Goldenrod is a herbaceous wildflower native to Eastern North America[1]. Scientifically known as Solidago caesia,it grows up to 3' tall in part shade to part sun[2]. Blooming numerous...