Ok – so here is a little DIY Christmas gift for kids that is a lot of fun to make and shoot. A simple toy gun that shoots milk-jug caps…so that means ammo is free and you will never run out!
I actually made this about three years ago, and was completely inspired (and copied) the idea from Mathias Wendell and his cool video. The main difference is that his was designed for baby food caps, and well, we don’t use that so I figured making a simple one for shooting milk-jug caps would be better for my kids.

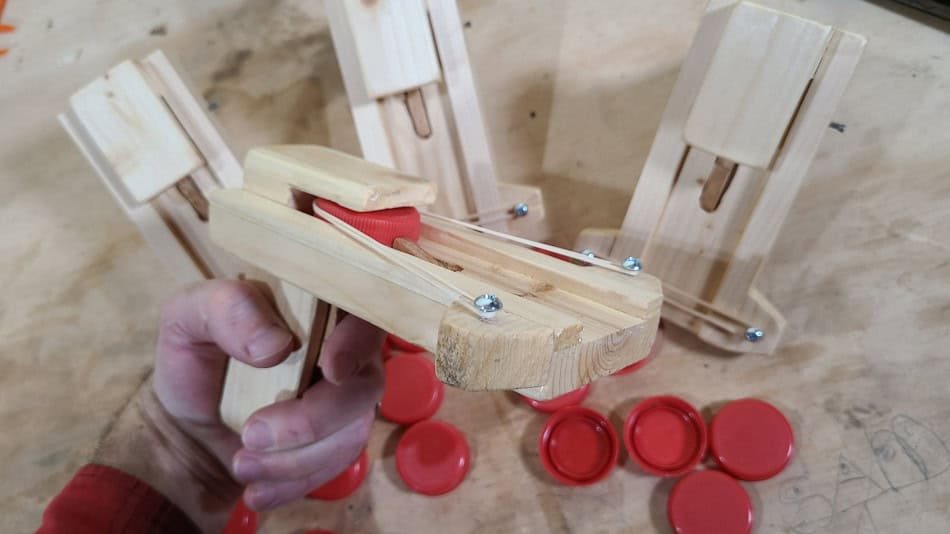
And it does a great job! It sends a milk-jug cap 10-20 feet through the air depending on the rubber band you use. Another nice thing about it, is that the caps slow down very quickly, so there isn’t too much risk of someone shooting a glass of milk and having it spill because there just isn’t enough force.
So, below I will show you how I made it and you can download the plans. No cost! And Merry Christmas!
Materials
For tools, you will need at a bare minimum the following:
- 1×3 furring strip
- 2×4 scrap
- 1/4″ thick board at least 3″x3″ square
- A couple of small strips 6″x1/2″x1/4″
- Pan head screws #8×3/4″
- Long finishing nail, 6dx2″
For the most part, I used scrap wood for this project. I sawed most of my pieces, by hand (yes I have patience). Some of this was way more work then necessary. For instance, as you will see later, I have two guide rails to keep the milkjug cap centered when firing. Well, I ripped these from a 1×3″ and then planed them smooth. You could easily just buy (or find) a piece of 1/4″ plywood and use that instead.
Tools
- Handsaw or coping saw
- Drill
- Sand paper or a file
- Clamps
- Chisel
Some optional tools that really, really help would be a vice (machinist or woodworking), a hand plane, and a drill press.
Building the components
Base plate
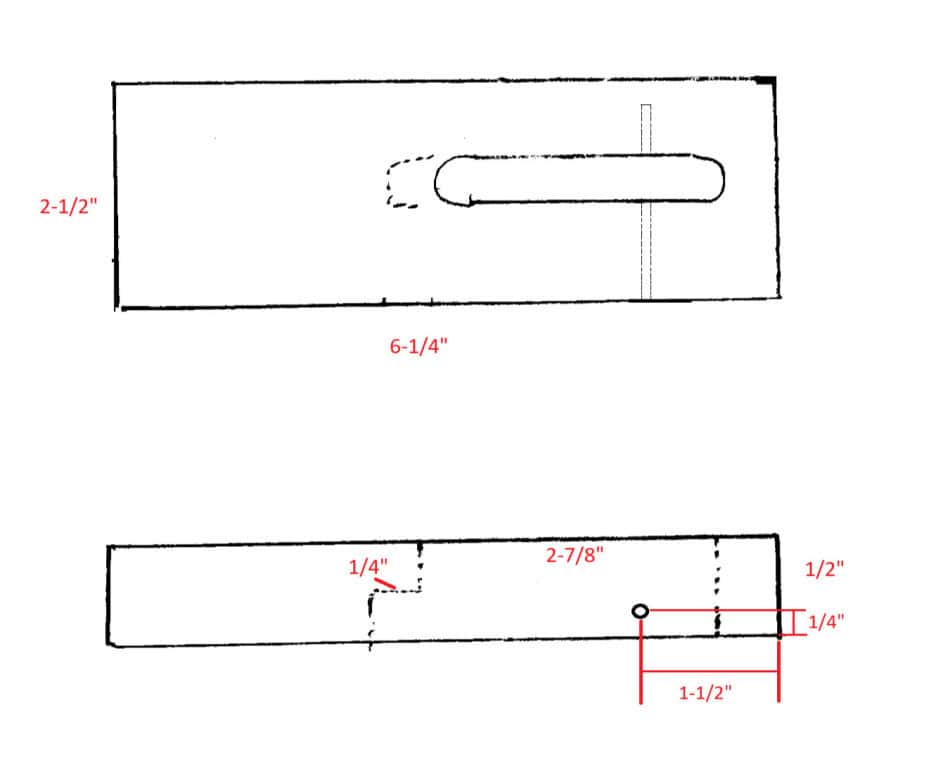
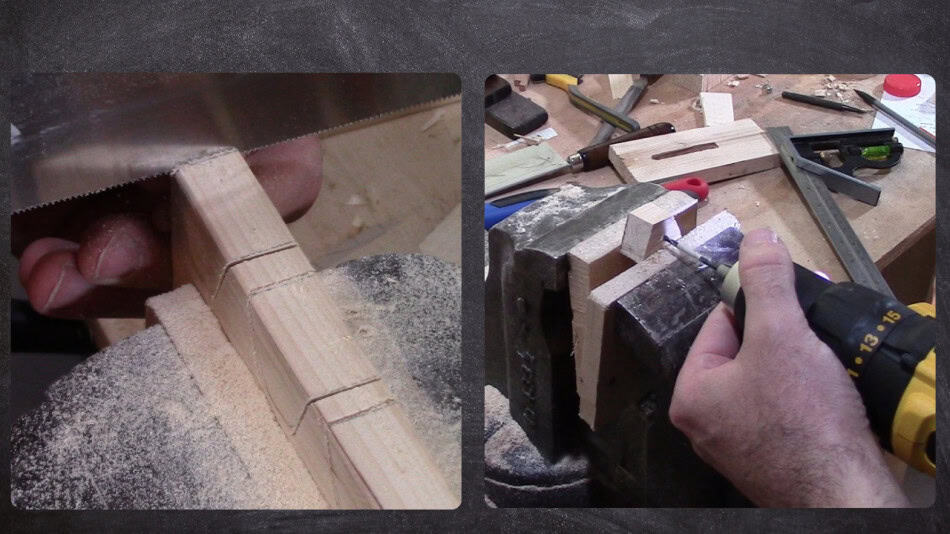
The base plate is the main board that the caps will slide one. It is also the most central piece of the gun. I cut down a 1×3 (0.75″ x 2.5″ nominal) down to 1/2″ thickness. Then, using a drill press and coping saw was able to cut the majority of the slot out. The slot is where the trigger will go, and is critical for the gun to function.
Now, on the bottom of the base plate slot there is a notch. This notch will prevent the trigger from sitting too high on the plate. Use a chisel to chop out the notch.

Trigger
The most complicated piece of the whole gun is the trigger. Now, I have a plan (shown at right) with approximate dimensions. But really, the easiest thing to do is to just print out this pdf on 8.5×11″ paper, and cut out the template. I traced one of the triggers I made, so it is easy.
For the holes, you will see that there are no locating dimensions. This is on purpose, as you will need to locate the holes based on your base plate. So, I will have more to say on that later for the assembly of the gun.

But start with a square board 1/4″ thick, that is about 3″ by 3″. Then, simply cut out the template or use the dimensions as needed. Each trigger will be a bit custom for each gun.

Pistol Grip
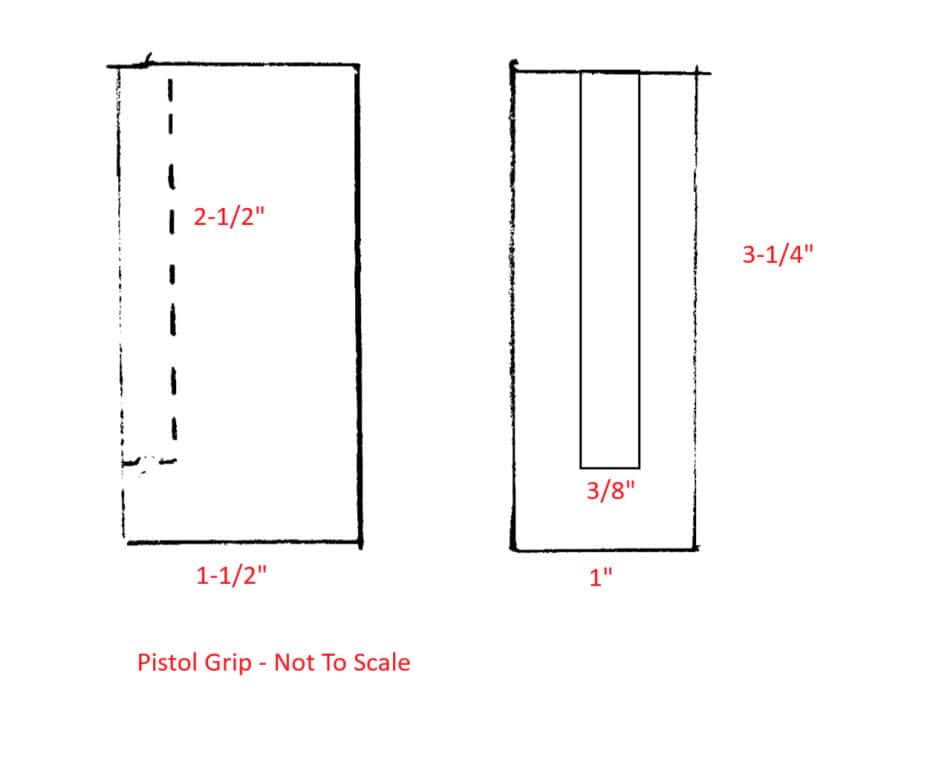
The pistol grip starts by ripping a 2×4 to 1″ thick. You could make it thicker, but it will be harder for a child to hold the gun. But the dimensions at right are approximate. You will probably want to use a chisel, sand paper, or a spokeshave to shape the handle to better fit your hand (I did).
The center groove you will chisel out. I used a 1/4″ chisel for this, as I didn’t have a 3/8″. A note on using a chisel…always always always make the cross grain cuts. Having the chisel cutting edge parallel to the grain can result in a split board.
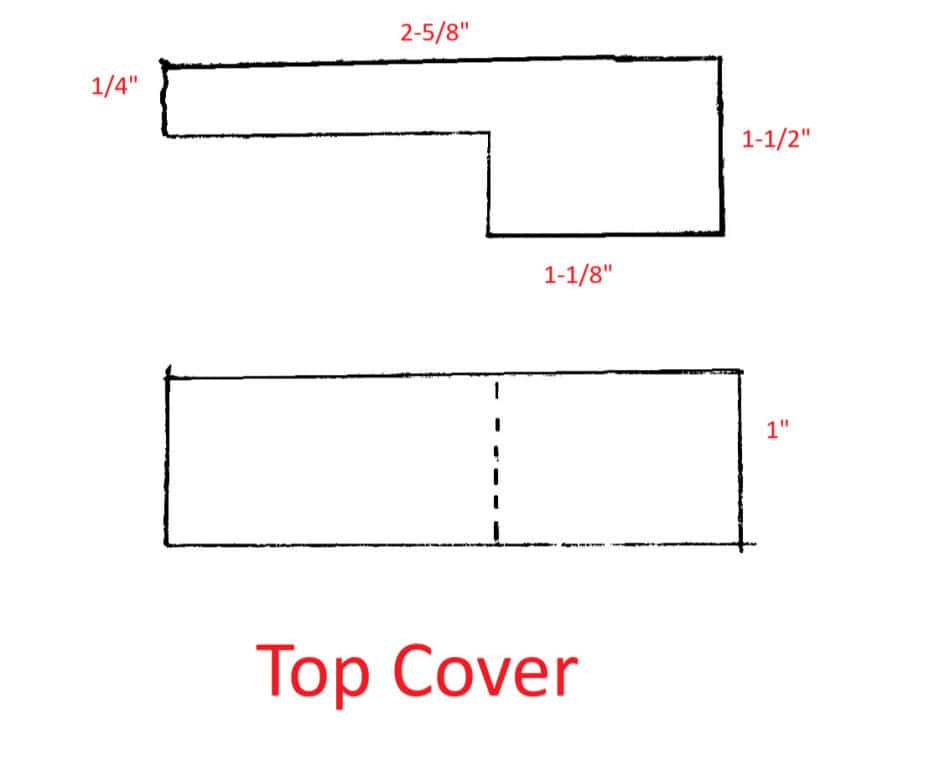
Top Cover
The top cover is simple cut from a scrap of 2×4″ or something similar. It should just take three cuts to make. You will want to clean the corner with a chisel and sand paper (or a file).

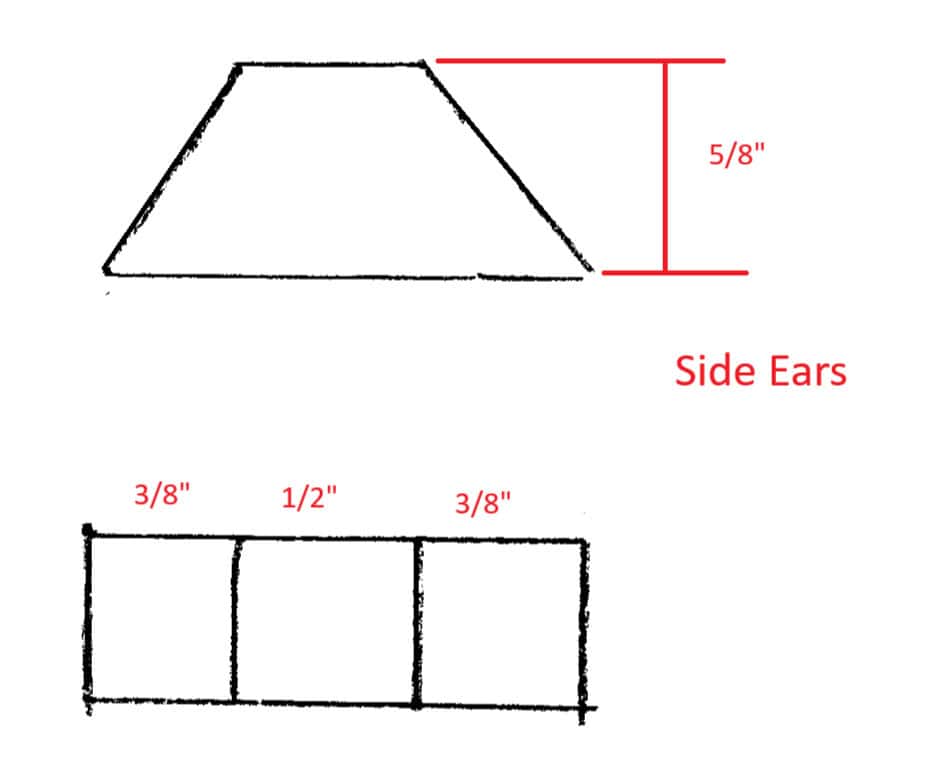
Ears
Cut the ears out of scrap 1×3″. Just mark your lines and go. Clean it up with sand paper or a plane.
Also, you will need to drill a pilot hole in the ears. It’s easier to do this while it’s still clamped down.
Rails
I ripped two small strips from a 1×2 to serve as guides/rails for the milk jug cap when fired. I carefully used a handsaw to cut the strips, and then cleaned them up with a hand plane. You could probably buy 1/4″ plywood, and rip a couple pieces off of that, which would definitely be easier.
So, rip them a little thicker than needed, and plan on cleaning them up. The final dimensions are 1/2″ x 1/4″, and then I had them run the full length of the base plate.

Assembling the gun
Alright, so once our pieces are all cut and cleaned up, it is time to start putting it all together. The most critical job is going to be fitting the trigger to the base plate. If you don’t get this right, the gun will not function.
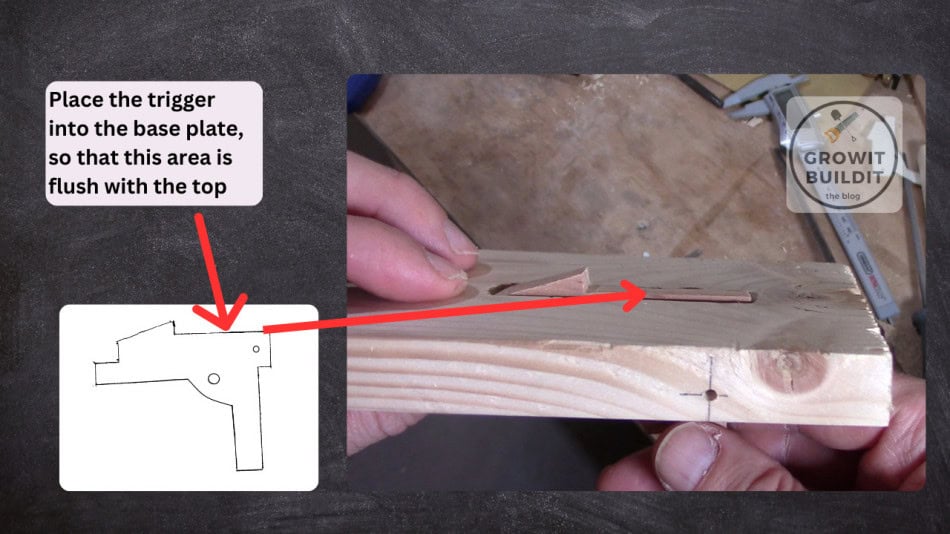
How we will do this (in a nutshell) is to drill the hole for the rotating pin (finish nail), then place the trigger in the baseplate and clamp a board over the flat top (where the milk cap sits), so it sits flush with the top of the base plate. Then we will use the finish nail to mark the exact location we need to drill a hole in the trigger, and then do so.
Drilling hole for trigger rotating pin
So, first things first, we need to mark and drill a hole large enough for the finish nail. Use a 1/8″ drill bit to do this, and it really, really helps if you have a drill press. If you don’t, I suggest clamping the board to your work surface, and carefully drilling as straight as you can. The hole will need to go just a little less than 2″ deep. This way you can pull the nail out with pliers if needed to make repairs, should a trigger be damaged.

Locate trigger pivot hole
Now we need to locate where to put the hole on our trigger. This must be correct, but luckily we can do it by simply placing the trigger in the correct location and using the finish nail to locate it.


Drill the hole using a 1/8″ bit.
Glue the rails
The guide rails need to be glued on first. Simply put a line of glue on them, and slap them on the sides of the base plate. Clamp, and let dry.
Glue the pistol grip
If you customized the ‘fit’ of your pistol grip, then you may have to get creative when clamping it. My grip wasn’t perpendicular to the base plate, so a traditional clamp wouldn’t work. What I did instead was to simply slap a lot of glue on the end, then hold it in place using another board and a 10 lb dumbbell.

Glue the top cover and ears
The ears can simply be glued to the side and clamped with a single clamp. Likewise, the top cover can be glued and clamped to the pistol grip, once that is dry.

Clean up sharp edges
At this point you can use a rasp, file, or just sand paper to clean up any sharp edges. Little kids can be rough, and making sure there are no potential splinters or sharp corners is a good idea.
Drill second trigger hole
Ok, so we drilled the rotating trigger hole, but we need a second trigger hole for the rubber band. So, to do that, now that the gun is basically glued, install the trigger. Push the trigger to the highest position, and then simply mark a location where you can drill a 1/4″ diameter hole.
Putting the hole too close to the rounded edge can result in the trigger breaking, etc. So, center the hole at least 1/2″ away from the edge of the radius, but far enough out so it won’t get hung up in the pistol grip. This should result in a minimum wall thickness of 1/4″.
Apply a finish (optional)
You can apply a finish to the gun now. I like linseed oil or wipe on poly. Use 2-3 coats to help protect it for many years.
Add install screws
Alright, now it’s time to install the pan head screws on the ears, and on the bottom of the base plate. These are needed for loading the rubber bands. Make sure you drill pilot holes! You don’t want to have the ears or baseplate split!
For locating the screw on the bottom, just place it 1/2″ to 1″ in front of the trigger.

Install trigger and load the rubber bands
Before pinning the trigger with the nail, it helps to slip a rubber band through the hole. Then, simply insert the trigger and push the finish nail through. Wrap this rubber band, and then stretch a rubber band around the other two screws and the gun is now finished.

Conclusion
This is a fun project to do, my kids love playing with the guns, and they are safe to shoot in the house. Plus, there is something special knowing that you made a toy for your kids.
Find more DIY projects here!
Recent Posts
Green Milkweed is a herbaceous wildflower native to North America[1], and is a host plant for caterpillars of the Monarch Butterfly[2]. Scientifically known as Asclepias viridis, it grows up to...
Keystone Plants - What Are They, And Why Are They Important?
If you've been researching native plants, you may have come across the term "Keystone Plant" or "Keystone Species". Often spoken or reverence or casually noted for their importance. So, what exactly...